Rid your home of mould naturally with three simple, easy, and effective DIY recipes.
What is mould?
Mould is type of fungus that grows in damp, poorly-ventilated environments. It has a musty odour and plays an important role in the ecosystem to decompose organic matter. There are several types of mould that can grow, including a variety from which the antibiotic penicillin is derived! However, mould spores in the home can be toxic and pose a health risk – causing allergic reactions, rashes, headaches and illness.
It’s important to keep your home mould-free by regularly cleaning and minimizing moisture – especially in your kitchen, bathroom and basement where mould tends to thrive. However, especially after periods of heavy rain, the damp, humid conditions can lead to excess mould growth which is why we’ve created three recipes to help remove and prevent mould in the home.
Ventilation is of high importance for all the following recipes. Ensure you open all your doors and windows to allow air flow and control humidity. We also recommend using a dehumidifier.
IMPORTANT NOTICE
These recipes are only effective on visible mould. However, mould can infiltrate walls and flooring which is not visible to the naked eye. These home-remedies are effective on small areas, but we recommend calling a professional mould removalist for more severe cases.
Anti-Mould Essential Oils Blend
This blend doesn’t just mask the musty, damp mould odour, but eliminates the cause.
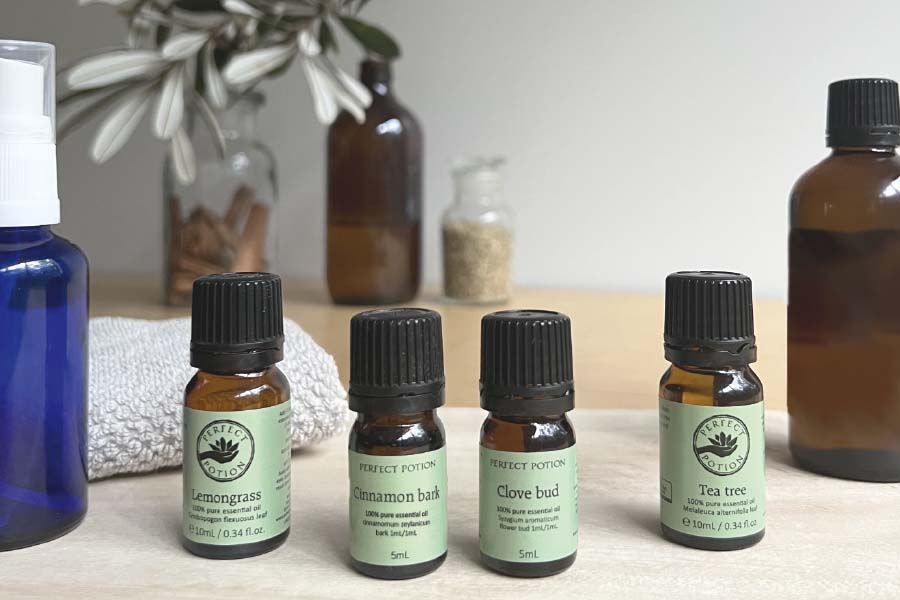
Clove, tea tree, red thyme and lemongrass pure essential oils have proven through various scientific studies to be effective in killing various types of mould; with chemical constituents and compounds such as thymol and eugenol inhibiting mould spore germination, rendering mould inactive and preventing mould spores from growing.
This base recipe (total 35 drops) is to be used in the following mould-eradicating and mould-preventing recipes:
| 20 DROPS | 5 DROPS | 5 DROPS | 5 DROPS |
 |
 |
 |
 |
|
Tea Tree Melaleuca alternifolia Pure Essential Oil |
Clove Bud Syzygium aromaticum Pure Essential Oil |
Cinnamon Bark Cinnamomum zeylanicum Pure Essential Oil |
Lemongrass |
DIY Mould-Removing Scrub
For hard-to-remove mould, all you need is this vinegar scrub and some elbow grease. Vinegar has been proven to kill up to 82% of mould species including black mould, and this natural acid is readily available, affordable and has multiple uses. Combined with baking soda, and combined with the Anti-Mould blend of oils, it forms an effective scrub to polish away stubborn mould.
Where to use:
This recipe is for non-porous surfaces that require scrubbing.
CAUTION: Do not use this recipe on areas vulnerable to scratches, stains or strong cleaning agents.
What You Need:
- Glass mixing bowl and wooden spoon
- ¼ cup of vinegar
- ½ cup of baking soda
- 35 drops of Anti-Mould Essential Oil Blend
- 2x clean, dry microfiber cloths
- Face mask and gloves for protection.
How To Use:
Please wear protective gloves and a face mask to keep safe throughout all steps.
1. Simply mix all the ingredients in a safe, glass mixing bowl to create a paste.
2. Dip a damp cloth into the mixture and wipe over mouldy area until completely covered.
3. Allow it to sit for up to 60 minutes, or until dry.
4. Scrub the dried paste away, then wipe clean with a cloth and hot water.
5. Follow with ANTI-MOULD SPRAY.
WARNING:
Do not mix vinegar with bleach. Mixing vinegar with bleach produces toxic chlorine gas.
 DIY Anti-Mould Spray
With only 1 base ingredient (undiluted white vinegar) and 4 pure essential oils, this potent potion helps prevent mould, mildew and other fungal or bacterial growth using 100% natural, sustainable, vegan ingredients.
Where to use:
This recipe is best used on surfaces after having cleaned away mould to prevent the mould from resurfacing.
CAUTION: Do not use on timber, varnish surfaces, or any other surface vulnerable to strong cleaning agents. Patch test surfaces in a discreet area before use. Observe the surface for any changes that may occur over the long term.
What You Need:
- 50mL Glass Spray Bottle
- 40mL White Vinegar
- 35 drops of Anti-Mould Essential Oil Blend
- Clean, dry microfiber cloths (as many as required)
- Face mask and gloves for protection.
How To Use:
Please wear protective gloves and a face mask to keep safe throughout all steps.
1. Add ANTI-MOULD BLEND to your glass spray bottle.
2. Fill to the top with undiluted white vinegar.
3. Shake well
4. Spray on affected area and let sit for approx. 60 minutes until completely dry.
5. Wipe with a clean, dry cloth.
6. (Optional) Spray again and allow to air dry.
DIY Anti-Mould Floor Cleaner
You can also add this Anti-Mould Essential Oil Blend to a bucket of soapy water to use as a floor cleaner. This will help keep your home protected and smelling fresh.
Where to use:
This recipe is best used on tiled surfaces and floors such as your bathroom and kitchen.
CAUTION: Do not use on waxed wooden floors, as the castile soap will break down the wax.
What You Need:
- Bucket and mop
- Approx. 15L of hot water (adjust to mop bucket)
- ⅛ to ¼ cup castile soap
- 5 drops ANTI-MOULD Blend
How To Use:
Please wear protective gloves and a face mask to keep safe throughout all steps.
1. Add castile soap to hot water and mix.
2. Add 5 drops of Anti-Mould Essential Oil Blend and mix.
3. Mop your floors and allow to air dry.
ADVICE
Non-porous surfaces should be fine to clean. Semi-porous surfaces may be more difficult.
Remember household surfaces vary, so try a little of the product at a time and check for discolouration or damage to the surface. Patch test in a discrete place. Observe the surface for any changes that may occur over the long term.
Safety Precautions
Before making and using these recipes, please take heed of these cautionary warnings:
Personal Safety• Wear protective gloves. High concentration of some ingredients may irritate the skin.
• Keep out of reach of children.
• Do not ingest ingredients. These recipes are not intended for consumption.
• Follow safety precautions of all individual ingredients – including essential oils.
• Never mix vinegar with bleach as it makes chlorine gas.
• Label all your products.
• Remember that household surfaces vary, so test a little of the product in a discrete place and observe the surface for any changes (scratches, discoloration or damage) that may occur before applying to the full surface.
• Do not use on varnish, stone/marble, timber, paint or plastic surfaces – or any surfaces vulnerable to strong cleaning agents.

